How kubectl uses Kubernetes API
- August 19, 2019
- tuxotron

As you probably already know, any type of query or command that you run against Kubernetes, it is done by sending an API request to a component called API server. This component lives in the master node/s.

The most common way to interact with a Kubernetes cluster, although you have several graphical options, it is through a command line tool called kubectl.
This tool provides a quite extended number of options, but in this entry I’m going to focus on verbosity, which is a very handy option if we want to learn more how kubectl interacts with the component mentioned previously: the API server.
Any command we run though kubectl, we can ask to obtain a more verbose output by adding the -v or –v option to it. This option also gets the level of verbosity we would like to get out of our command as a parameter. Such level is specified by a number between 0 and 9 inclusive, and each level provides a certain degree of verbosity as you can see in the following image:

For instance, if we run the following command:
kubectl get pods
NAME                     READY   STATUS    RESTARTS   AGE
nginx-7bb7cd8db5-8z6t8   1/1     Running   0          33s
We get the pods running in the default workspace.
Now, if we add to the previous command the option -v=5:
kubectl get pods -v=5
I0819 17:02:54.174578   30833 get.go:564] no kind "Table" is registered for version "meta.k8s.io/v1beta1" in scheme "k8s.io/kubernetes/pkg/api/legacyscheme/scheme.go:30"
NAME                     READY   STATUS    RESTARTS   AGE
nginx-7bb7cd8db5-8z6t8   1/1     Running   0          26s
Besides the same result we obtained previously, we can also see some extra information. Levels between 0 and 5 will give you back some extra information about what’s going on while kubectl runs. This could be very helpful for debugging purposes. But in this post, I want to focus on levels 6 to 9, in which kubectl will also provide information about the resources called (API) and the information sent and received (headers and body) from those calls.
Let’s run again the previous command, but changing the verbosity level to 6:
kubectl get pods -v=6
...
I0819 17:11:39.565753   30923 round_trippers.go:438] GET https://192.168.99.110:8443/api/v1/namespaces/default/pods?limit=500 200 OK in 12 milliseconds
...
As you can see here, we see now some extra information about the calls made to the API server, in this case a GET request to https://192.168.99.110:8443/api/v1/namespaces/default/pods?limit=500. Here you can also see the limit parameter issued by 'kubectl, so if you run a get pods and only get 500 pods back, now you know where the limitation is coming from ;)
Let’s try now with verbosity level 7:
kubectl get pods -v=7
...
I0819 17:22:29.600084   31029 round_trippers.go:416] GET https://192.168.99.110:8443/api/v1/namespaces/default/pods?limit=500
I0819 17:22:29.600108   31029 round_trippers.go:423] Request Headers:
I0819 17:22:29.600118   31029 round_trippers.go:426]     Accept: application/json;as=Table;v=v1beta1;g=meta.k8s.io, application/json
I0819 17:22:29.600132   31029 round_trippers.go:426]     User-Agent: kubectl/v1.15.2 (darwin/amd64) kubernetes/f627830
I0819 17:22:29.612086   31029 round_trippers.go:441] Response Status: 200 OK in 11 milliseconds
...
As you can see here, the difference between levels 6 and 7, is that in 6 we only see the resources called, and 7 we also see the HTTP headers of such calls.
In levels 8 and 9, besides the headers, we also get the body content. The difference between these two, 8 and 9, is that in 9 the content is not truncated while in 8 it is. Let’s see an example:
kubectl get pods -v=8
...
I0819 17:22:22.188395   31000 request.go:947] Response Body: {"kind":"Table","apiVersion":"meta.k8s.io/v1beta1","metadata":{"selfLink":"/api/v1/namespaces/default/pods","resourceVersion":"70162"},"columnDefinitions":[{"name":"Name","type":"string","format":"name","description":"Name must be unique within a namespace. Is required when creating resources, although some resources may allow a client to request the generation of an appropriate name automatically. Name is primarily intended for creation idempotence and configuration definition. Cannot be updated. More info: http://kubernetes.io/docs/user-guide/identifiers#names","priority":0},{"name":"Ready","type":"string","format":"","description":"The aggregate readiness state of this pod for accepting traffic.","priority":0},{"name":"Status","type":"string","format":"","description":"The aggregate status of the containers in this pod.","priority":0},{"name":"Restarts","type":"integer","format":"","description":"The number of times the containers in this pod have been restarted.","priority":0},{"name":"Age","type":"string [truncated 2611 chars]
...
Let’s check out now a different command with a little bit more complexity:
kubectl describe pod nginx-7bb7cd8db5-8z6t8 -v=6
...
I0819 17:26:27.770772   31121 round_trippers.go:438] GET https://192.168.99.110:8443/api/v1/namespaces/default/pods/nginx-7bb7cd8db5-8z6t8 200 OK in 12 milliseconds
I0819 17:26:27.777728   31121 round_trippers.go:438] GET https://192.168.99.110:8443/api/v1/namespaces/default/pods/nginx-7bb7cd8db5-8z6t8 200 OK in 2 milliseconds
I0819 17:26:27.786906   31121 round_trippers.go:438] GET https://192.168.99.110:8443/api/v1/namespaces/default/events?fieldSelector=involvedObject.name%3Dnginx-7bb7cd8db5-8z6t8%2CinvolvedObject.namespace%3Ddefault%2CinvolvedObject.uid%3D9e77227d-cc08-4365-aeab-c0bbbfc1c1d8 200 OK in 2 milliseconds
...
Here you can observe that describe requires more than one call to the API server.
And lastly, let’s create a deployment using the run command:
kubectl run nginx2 --image nginx -v=8
...
I0819 17:29:23.727063   31398 round_trippers.go:416] GET https://192.168.99.110:8443/apis/apps/v1?timeout=32s
I0819 17:29:23.727097   31398 round_trippers.go:423] Request Headers:
...
I0819 17:29:23.749539   31398 request.go:947] Request Body: {"kind":"Deployment","apiVersion":"apps/v1","metadata":{"name":"nginx2","creationTimestamp":null,"labels":{"run":"nginx2"}},"spec":{"replicas":1,"selector":{"matchLabels":{"run":"nginx2"}},"template":{"metadata":{"creationTimestamp":null,"labels":{"run":"nginx2"}},"spec":{"containers":[{"name":"nginx2","image":"nginx","resources":{}}]}},"strategy":{}},"status":{}}
I0819 17:29:23.749618   31398 round_trippers.go:416] POST https://192.168.99.110:8443/apis/apps/v1/namespaces/default/deployments
I0819 17:29:23.749631   31398 round_trippers.go:423] Request Headers:
I0819 17:29:23.749638   31398 round_trippers.go:426]     Content-Type: application/json
I0819 17:29:23.749645   31398 round_trippers.go:426]     User-Agent: kubectl/v1.15.2 (darwin/amd64) kubernetes/f627830
...
In this case we see that kubectl not only makes a GET request, but also a POST request, and because we are using the verbosity level 8, we can also see the body content of that POST request, as well as the responses back from GET and POST.
This is a very nice way to see how kubectl uses the Kubernetes API behind the scene and also an interactive way to learn more about the this API, besides obviously consulting its documentation.
Happy Hacking!
Moving the blog images from Flickr to Digital Ocean Spaces
- February 3, 2019
- tuxotron

In this blog we have been using Flickr as our main images repository since 2008. We even paid for a pro account for a couple of years back in 2015 and 2016, however I can’t recall the benefits of a pro account versus the free one.
Our experience with Flickr has been always very positive and never had an issue with them, but after the acquisition of Flickr by SmugMug, they recently changed the policies, and they announced that the free accounts will be limited to 1,000 images, the rest will be removed. In Cyberhades we have exactly 3,997 images in Flickr, so if we want to maintain all these images we need to pay for a pro account, which is around $50 a year or $6 a month. The Flickr pro account offer more than just unlimited number of images, and if you are a photographer you may benefit from these other perks, but in our case, besides de CDN we are not getting any benefit.
The reason for this blog post is not to talk about that we moved out from Flickr, but how we did it.
The first thing we needed to decide was where to migrate. After looking around into several cloud providers, we decided to go with Digital Ocean’s (DO) Spaces. One thing I do like about DO is their fixed price policy, and also we moved our blog infrastructure to DO about 3 years ago and the service, and experience have been excellent.
DO offers a service called Spaces. It is compatible with AWS S3, this means you can interact with this service using any tool that can interact with AWS S3 and it also has a CDN, which is pretty much all we need for the blog.
Once we had decided where to migrate, it was time to get our hands dirty. The first we need was to download our pictures from Flickr. Luckily Flickr allow you to download all the data they have about you, including all the files (images, videos, etc). You can do this from your account settings page. There is an option to request your data, after you do so, it can take a while, depending on how many files you have there.
When your data is ready, you will see something like this:

Each one of these zip archives contain 500 files. After downloading these archives and extract their content, we faced out first problem. The filenames are not the same when we uploaded them. Flickr adds an id number plus “_o” at the end of the filename, before the extension. For instance, if you upload an image to Flickr with the following name: libro-microhistorias-informatica--nuevo0xword.jpg, Flickr will store it with something like: libro-microhistorias-informatica--nuevo0xword_8768892888_o.jpg. That 8768892888 is an unique identifier.
The next problem we had to solve was how to know what picture corresponded to what link in our current blog posts. Some of the links to Flickr looked like this: https://farm4.staticflickr.com/3803/8768892888_8932423465.jpg. As you can see here, there is not picture name, although we have the picture id. So we needed a way to map the pictures id with their name in order to later replace all these links.
To do that I wrote a small Python script, where I read all the images I downloaded from Flickr, extract the id from their name and put such id in a dictionary as a key and the filename as its value. Here is a little snippet:
def loadFilenames(picspath):

    dict = {}

    onlyfiles = [f for f in listdir(picspath) if isfile(join(picspath, f))]
    for entry in onlyfiles:
        tokens = entry.split("_")
        if tokens[-3].isdigit():
            dict[tokens[-3]] = entry
        if len(tokens) > 3 and tokens[-4].isdigit():
            dict[tokens[-4]] = entry

    return dict
The next step was to find all the links to Flickr on our over 6,000 blog posts. We found out tha the links weren’t consistent, and there were slightly different link format. We identified 3 different groups, so to match these groups we came up with 3 different regular expressions:
matches = re.findall("http[s]?://farm?.\.static\.*flickr\.com/\d+/\d+_\w+\.[a-z]{3,4}", c)
matches = matches + re.findall("http[s]?://www\.flickr\.com/photos/cyberhades/\d+/*", c)
matches = matches + re.findall("http[s]?://c?.\.staticflickr\.com/\d+/\d+/\d+_\w+\.[a-z]{3,4}", c)
After this, we needed to go through each of the blog post, find any link that matched any of these regular expressions and replace them with the links from DO Spaces, but to do this, we needed first our images in DO.
Spaces is $5 a month, and you get 250gb of space. When we created our Space, we activated the CDN option. Once the Space was created, we were ready to start uploading our images. You can use their web interface, a third party client compatible with S3 or write your own code to do so. As a passionate developer, I took the latter option :) and I wrote a small Go application for that. One thing to keep in mind is to make sure you make the images public, and also you need to set the right Content-Type. You will also need to create a token from the DO website to access to your Space. Here is a little snippet:
func GetFileContentType(out *os.File) (string, error) {

  // Only the first 512 bytes are used to sniff the content type.
  buffer := make([]byte, 512)

  _, err := out.Read(buffer)
  if err != nil {
    return "", err
  }
  contentType := http.DetectContentType(buffer)

  return contentType, nil
}

...
// Make the file public
userMetaData := map[string]string{"x-amz-acl": "public-read"}

// Upload the file with FPutObject
n, err := client.FPutObject(spaceName, objectName+strings.Replace(path, dirPath, "", 1), path, minio.PutObjectOptions{ContentType: contentType, CacheControl: cacheControl, UserMetadata: userMetaData})
if err != nil {
  log.Fatalln(err)
}
...
There is one more thing we needed to do before uploading all the images to our Space. The images we downloaded from Flickr are the original ones, this means, most of them are pretty large and not suitable for a blog post. One think Flickr does when you upload an image, it creates different sizes out of the original one, ideal for blogs and other matters. So before uploading our images, we need to downscale them to 600px width. Also, we don’t want to upscale any image that is smaller and lastly we want to keep the aspect ratio. To do this we used the magnificent ffmpeg:
for i in *; do ffmpeg -i $i -vf "scale='min(600,iw)':-1'" ${i%.*}_opt.${i#*.}; done
The scale='min(600,iw)' option, we are telling ffmpeg to only scale these images which width is larger than 600px. And with :-1 we are telling to resize the height to number of pixels that will keep the aspect ratio. This will generate another set of files with the same name, but adding “_opt” at end of their name (before the extension), this way, we’ll preserve the original images.
Now is time to upload our optimized images to DO.

One your images are uploaded, we can see we have two links available to access them, Origin and Edge. The link we are interested is the Edge link, which uses the CDN to delivery our images.
Finally, all we need to do is to replace all the Flickr links in our blog posts with the new ones. Here is a snippet of the code that takes care of that part:
...
for match in matches:
    if '_' in match:
        k = match.split('/')[-1].split('_')[0]
    else:
        tokens = match.split('/')
        if tokens[-1].isdigit():
            k = tokens[-1]
        else:
            k = tokens[-2]

    if k in dict:
        c = c.replace(match, "https://cyberhades.ams3.cdn.digitaloceanspaces.com/imagenes/" + dict[k])

print(entry)
o = open(entry, "w", encoding = "ISO-8859-1")
o.write(c)
o.close()
...
The complete Python script can be found here.
The wrap up this post, DO Spaces is not cheaper than paying for a Flickr pro account (if you pay yearly), but with Spaces, we have more control over our pictures, and now all the links are pretty consistent, which means, if we need to do another migration or any other thing, it will make our life way easier.
Controlling your garage doors with an ESP32 - Part 3
- October 6, 2018
- tuxotron
Now that we have our ESP32 ready to rock and roll it is deployment time! The first thing we need to do is to use an MQTT broker with authentication. So far we have done all our tests using the free io.eclipse.org server without any kind of authentication, this means, if somebody knows the topics you are using, could open/close your garage door. Not good!
There are plenty of options out there you can use, but I personally roll out my own broker, so I am going to explain what I have done. I will be using a Moquitto broker, from the Eclipse foundation, and of course, inside a docker container ;)
I have also created my own docker image based on the official one, adding some extra functionality to be able to specify an username and password when you create your container, so you don’t have to deal with user and configuration files. I am running my MQTT broker in a droplet in Digital Ocean. All you need to make sure you have Docker installed in the host and also you will need to open at least port 1883/tcp. To bring your container up, all you need to run if the following command:
docker run -d --name mosquitto -p 1883 --restart=always -e MOSQUITTO_USER=YOUR_USERNAME -e MOSQUITTO_PASS=YOUR_PASS tuxotron/mosquitto
Here we are running a container called mosquitto, with the option of restart automatically and the credentials YOUR_USERNAME and YOUR_PASS (make sure you change these values). This container will also disable the anonymous access to our server, so basically you will be able to connect using that one user.
The next step would be to reconfigure our ESP32 to set the correct server, username and password credentials, as we explained in part 1 of this series. Make sure you update code for this project first. From inside the directory or your project’s code:
git pull origin master
After you make the configuration changes and flash the new code. You should see something like:
I (2545) MQTT_CLIENT: Sending MQTT CONNECT message, type: 1, id: 0000
I (3195) GARAGE: MQTT_EVENT_CONNECTED
I (3195) GARAGE: sent subscribe successful, msg_id=63593
I (3195) GARAGE: sent subscribe successful, msg_id=48468
I (3205) GARAGE: sent subscribe successful, msg_id=29761
I (3205) GARAGE: sent subscribe successful, msg_id=63161
I (3215) GARAGE: MQTT_EVENT_SUBSCRIBED, msg_id=63593
I (3225) GARAGE: MQTT_EVENT_SUBSCRIBED, msg_id=48468
I (3435) GARAGE: MQTT_EVENT_SUBSCRIBED, msg_id=29761
At this point we are ready to mount the device in our garage. In my case I follow the following schema to connect the relay to both garage door openers:
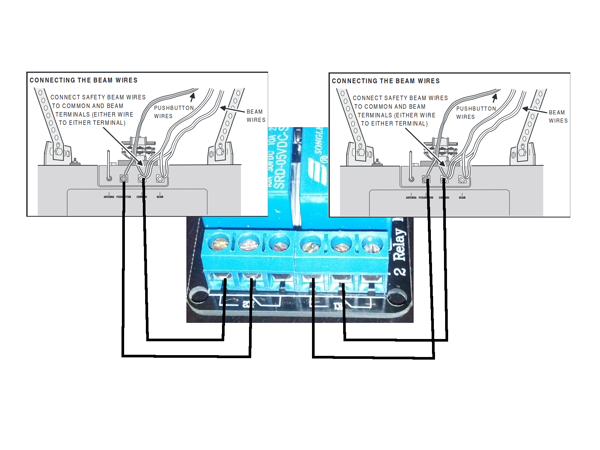
If your door opener has different connections, just look for the wires coming from the button that opens/closes your garage door and wire your relay with it.
The next thing will be to mount the magnetic switches, in this case you will have find the best spot to install them. I have installed this projects in 3 different houses and I had to install the switches in different places, since the doors were different. Here is a picture of how it looks like in my current garage:

Once you have wired up your relay to the door openers and the magnetic sensors, you are good to go. Here is a video of my current installation:
At this point, all you need to do in order to interact with your ESP32 is to send messages to the MQTT broker. As you have seen in the video, I was using MQTLens, but you can use practically any client. From the command line like we have seen in previous videos, a web application, mobile application, etc.
I’m finishing up an iOS application to control the garage doors from the phone. I won’t probably publish an entry for that since I’m not going to teach iOS development, but I will make the code available in Github and I will update this entry with the link.
The next thing to do would be to enable TLS in your broker and do all the communications through it. That’s in my to-do list, but I currently have some other priorities in my agenda, so eventually I will get it done and then I will publish a new entry to describe the changes. Until then, happy hacking!
Previous parts:
Books


Search
Recent
- Creating expired X.509 certificates
- Posts
- Docker image generator for infosec
- Extending kubectl
- How kubectl uses Kubernetes API
- Moving the blog images from Flickr to Digital Ocean Spaces
- Controlling your garage doors with an ESP32 - Part 3
- Controlling your garage doors with an ESP32 - Part 2
- Controlling your garage doors with an ESP32 - Part 1
- Size matters, but it is not all about the size